Resilience: Urban Rain/Grey Water Catchment System

Bisbo's recent desert treatment spurred me to finally rouse myself from my typical lethargy.
Here's the Chateau's answer to extra water for the garden.
Chateau Bidet circa 2001
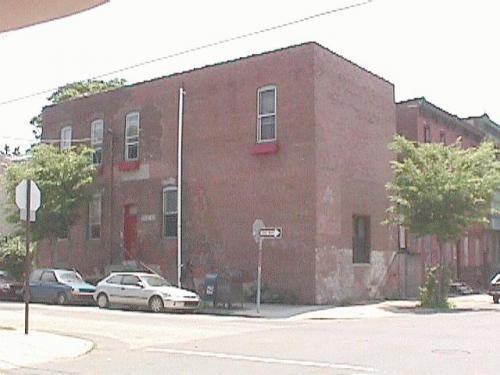
Between that picture and last year, those two facades became completely covered with ivy. The cretin SWPUWM hired to "trim around the windows" managed to kill the ivy. So now it's back to being more bidet and less chateau. Not a word. Not a word, please, or I'll restart having grievous bodily harm fantasies directed at all parties involved. Calm. Calm. Peace. Love. Watering the garden...
Chateau Bidet is an industrial building; a small factory, (erstwhile). As such it has 11' ceilings on the ground floor but the utilities (the drains from the second floor) are exposed. Were we not dyed-in-the-wool Hippies, this might have caused some concern vis-à-vis "civilized living". It never bothered us. When we moved in the whole place was sort of 1930s chic.
~~~~~~
Once the garden got going, it began to dawn on me that we had [pun alert] an untapped resource in the form of the drain water from upstairs. We bathed and showered with the water. Sent it down the drain to wherever, then had to buy more water to water the garden. Folly! Worse, sacrilege! "Och, mon. Ya dinna ken we'd just throw it away, did ya?"
Pay once, use twice!
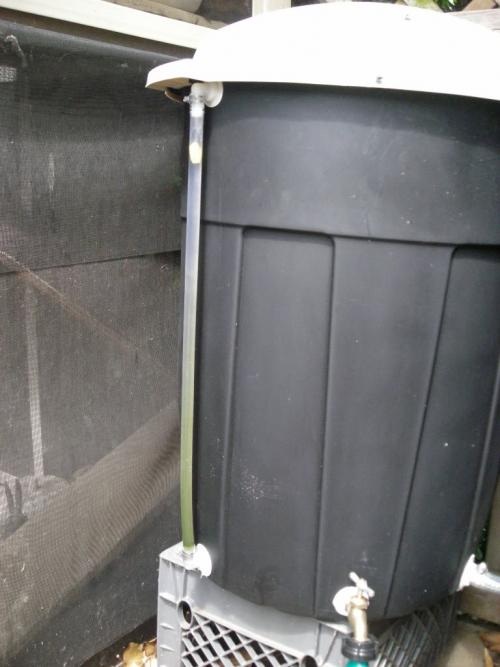
Here's the heart of the system -- a 1.5" PVC Ball Valve.
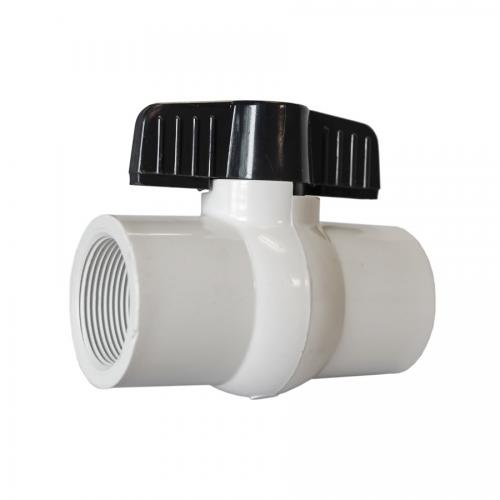
These are available in any hardware store or big box store.
~~~~~~
And here's the brains of the system.
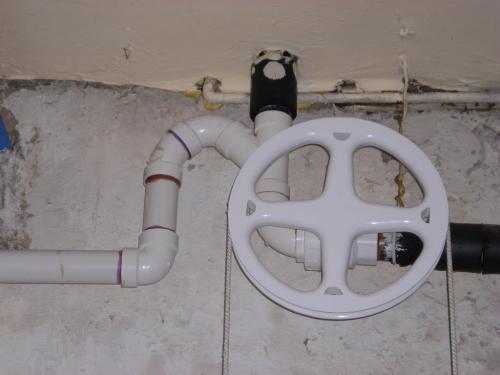
Since this is way up near the ceiling, about 10' off the floor, I needed a way to activate the valve easily without climbing a ladder or sprouting wings. I modeled the wheel after old style iron wheels that used to be used for all sorts of things back in the nineteenth and twentieth centuries. I looked for a long time for a "real" wheel, meaning one made of iron. No luck at all, and summer was fast approaching. This wheel is two layers of 1/2" birch plywood laminated together, pierced, and routed to form a recess on the edge. The black valve handle is mortised into the back side of the wheel, and held in place with metal straps and screws.
~~~~~~
Still, it had to be activated.

Simple logic: The handle nearest to the drain, in the "up" position, is where the water goes. Here, the drainwater is headed for "the river" which is off to the right. These handles are also 1/2" birch plywood, enameled.
~~~~~~
Time to head for the Great Outdoors.
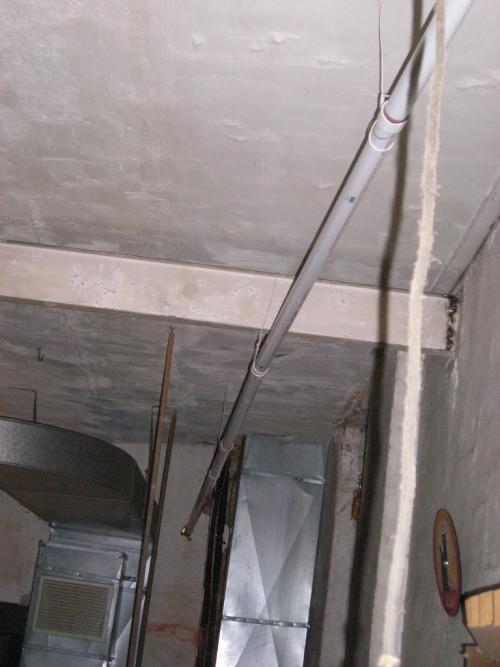
This is the "I've got bigger fish to fry" suspension system. Some wire and some screws into the ceiling. Haute Shabby has its place in the world, after all.
~~~~~~
After the long trip across the ceiling, we're finally outdoors.
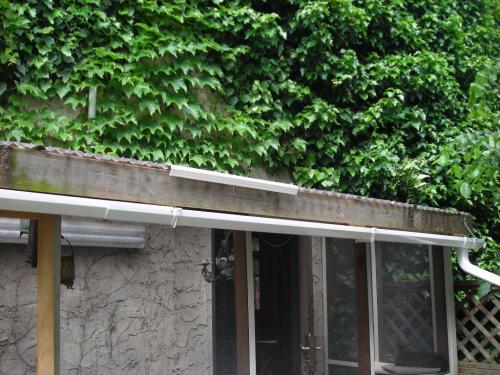
The pipe (just barely visible in the upper left corner of the picture) pokes out the back wall of the Chateau and makes a "90" down until it almost touches the roof of the Florida Room. "Room" is something of an exaggeration. It's 4'x14', but it lets the moggies smell the outdoors without escaping or getting too cozy with the flea-infested porch cats. Also, no fights.
The pipe is capped on the end and there's a series of holes out of the sides so that water escaping spreads out across the roof. The PVC strip across the bottom of the roof is to stop the water running down the roof from shooting out and all over the deck below. (Through trial and error, the strip was eventually enlarged and lengthened, but I don't have a picture of that.)
~~~~~~
Greywater meets rainwater.
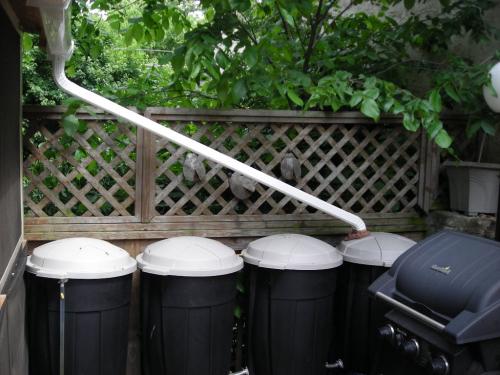
The roof of the Florida Room captures rainwater too. Together with the bathwter, it all goes into the barrels - 32gal. trash cans. The filler downspout goes to the farthest so that there is a constant flow of water in one direction, as opposed to filling and draining (using) the water directly under the gutter, and letting the rest molder.
~~~~~~
Detail of the grey/rainwater inlet.
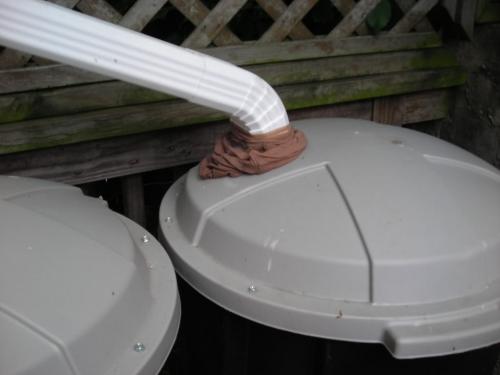
There are screens up at the gutter end, but even so small debris gets past them - mostly ivy berries. Here you see the leg of a pair of pantyhose. It serves three functions; the first is to capture the last of the detritus that makes it past the screens, and the second is to keep mosquitoes from getting into the water. The leg hangs down well into the barrel and the rubbish slowly decomposes and adds to the vitamin value of the water. I read that in The Jack-Leg Agronomist, really.
~~~~~~
Here's the whole shebang in one view.
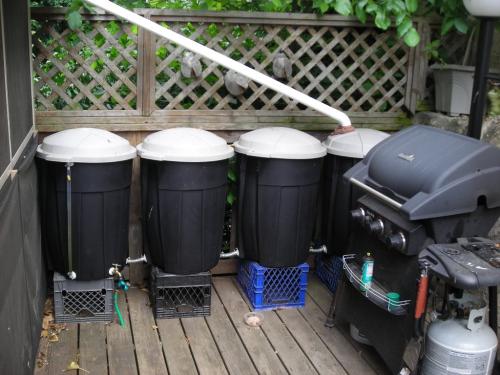
Notice the sturdy scraps of plywood* and plastic milk crates bases. I got this idea from one of the how-to articles in the back of Better Hovels & Outhouses magazine - Aug.-'08, I think. Some people collect back issues of National Geographic magazine. I save all my back issues of BH&O. Never know when some half-assed way to do something might arise and I need a pictorial reference. *The plywood wasn't "installed" until the year after these pictures were taken when it became apparent that the milk crates weren't spreading the weight out well enough.
~~~~~~
Detail of the fill gauge.
Cute, simple and effective. Great idea when it was brand new. As time went by, it would turn out to be slightly less practical than originally intended. Some kind of green algae grew in the tube, making it near impossible to see how much water was in the barrels. Once or twice a year, I'd loosen the band-clamp at the top and run a swab down the tube. Voila! Just like new.
~~~~~~
Doing double duty.
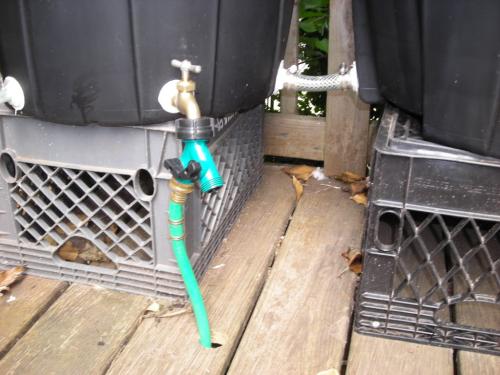
The spigot lets me shut off all the water in case of needing to replace any parts. The green hose goes to the garden. The tap on the right is to fill a watering can for the plants on the deck.
~~~~~~
End of the Line.
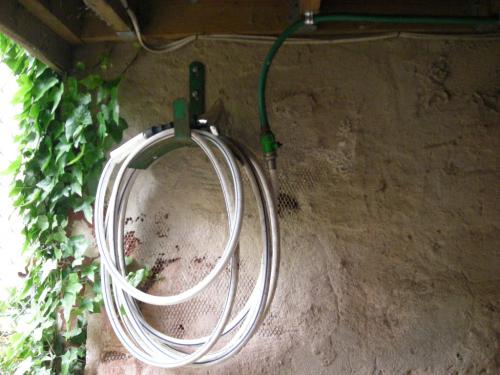
Here's where the system ends and the garden begins. As I spread out and use the coiled hose there's about 4' of drop, aka "head". It's not much in the way of pressure but with a big, wide "watering can" nozzle, it produces a very gentle rain-like spray. A good watering uses about 30gals. Takes a while, (half an hour.) But, I get to daydream and do something at the same time... listen to the local birds... watch all the tiny insects... think of big ideas... ponder time itself.
~~~~~~
Technical Note:
Greywater, courtesy of Wikipedia
Greywater (also spelled graywater) or sullage is all wastewater generated in households or office buildings from streams without fecal contamination, i.e. all streams except for the wastewater from toilets. Sources of greywater include, e.g. sinks, showers, baths, clothes washing machines or dish washers. As greywater contains fewer pathogens than domestic wastewater, it is generally safer to handle and easier to treat and reuse onsite for toilet flushing, landscape or crop irrigation, and other non-potable uses. However, the use of non-toxic and low-sodium soap and personal care products is recommended to protect vegetation when reusing greywater for irrigation purposes.[1] The application of greywater reuse in urban water systems provides substantial benefits for both the water supply subsystem by reducing the demand for fresh clean water as well as the wastewater subsystems by reducing the amount of wastewater required to be conveyed and treated.[2]
Greywater, by definition, does not include the discharge of toilets or fecally contaminated wastewater of any kind, which is designated sewage or blackwater to indicate it contains human waste. However, under certain conditions traces of feces, and therefore pathogens, might enter the greywater stream via effluent from the shower or washing machine.
Ours has barely any soap in it, no laundry detergents, and what soap it does have is Hippy Good For You soap.
~~~~~~
System capacity is 120gals, maximum. The clear tubing connecting the barrels was scrap from another project. Some of the band-clamps were extras from yet another project. Total outlay not counting the aforementioned parts was about $120, or $1/gallon.
~~~~~~
Hope you enjoyed the tour. Open for questions.

Comments
I think I have every element in my drawer and basement
and even have downspouts in areas flat enough for a setup like that. My "spare" garbage cans are currently in use as leaf-moving devices, with one additional drilled all about for a lidded compost maker/storage. Plus, two at the road, one marked "deliveries" for the lazy UPS guy and one for garbage presentation to the hauler.
My problem is called Winter. Then I would have garbage can size ice shapes. Which might be handy...
Hey! my dear friends or soon-to-be's, JtC could use the donations to keep this site functioning for those of us who can still see the life preserver or flotsam in the water.
Winter was a problem for these cans too.
They worked well enough when new, but as time and the elements, meaning ice, took their toll, leaks developed. Last year the outermost can failed. It split when frozen. I'd like to rebuild with a tank like Bisbo made. Plastic is just too fragile in the long run.
When Bis checks in maybe I can find out what those tanks are actually called so I can start to look around for one. Maybe they come in 100gals. size. That would be around 900lbs. Not too much weight for my deck. His (175gal. runs around 1500lbs. ...way more than I'd want to put out on my deck.
The real advantage of a galvanized tank would be durability with respect to the elements. (UV takes a tool too.) And if they were drained in winter when you don't need extra water for a garden, they should last quite a long time. (My system here is failing after 5 years.)
Improve the Resilience Resource Library by adding your links.
Vote Smart - Just the Facts - 40,000 politicians by name or zipcode
Oh, I had not thought of that
EZ solution: drain them down for winter. I could do that... I agree even Rubbermaid plastic has a lifespan, shortened by raccoon attention. I live in a temperate zone, on a private well whose flow rate precludes much pumped water use. And I am very dense looking at plumbing about how to isolate the house filter for cartridge change. It would take a few hot summer weeks with no rain and all potted plants would be in trouble. And I garden in pots now, too much tree shade for the raised beds now. That thought process indicates 2 catchment devices on different faces of the house. So even one can/catch would be a start. I am thinking elevations now...
Hey! my dear friends or soon-to-be's, JtC could use the donations to keep this site functioning for those of us who can still see the life preserver or flotsam in the water.
Forgot to add:
We were very acquisitive in the 70's re milk cartons, even have a metal one, home of the come-along. Which needs new tow straps. And while I am in the hardware section, buy spikes, one can never have too many spares.
Hey! my dear friends or soon-to-be's, JtC could use the donations to keep this site functioning for those of us who can still see the life preserver or flotsam in the water.
Hi AB
We got the tanks from Tractor Supply...there are similar chains near you, I am sure. I checked their webpage, and the equivalent one they are carrying now is just a bit different, 169 gallons, and without the vertical flutes: http://www.tractorsupply.com/tsc/product/oval-galvinized-stock-tank-2-ft... They also have a couple different shapes that come in close to 100 gallons...short and wide, tall and thin.
I getting many more ideas from your take on this...the panty hose sound perfect...never would have thought of that. And your pulley wheel is BEAUTIFUL. Great workmanship.
"I’m a human being, first and foremost, and as such I’m for whoever and whatever benefits humanity as a whole.” —Malcolm X
Yes, the pantyhose idea is perfect!
I have screens on the rain tanks I bought, but they are too large and mosquito larva would easily get in. The hose will work perfectly to block the input screens.
Got my eye on the 100gal. tank
and there's a Tractor Supply about 20mi. in Jersey. Definitely on the to-do list.
Thanks about the pulley wheel. Yea, it's nice when something comes off as planned and is pretty.
The handles pleased me even more pleasing, if you can believe it. They were an "Aha! I got creative" moment.
Improve the Resilience Resource Library by adding your links.
Vote Smart - Just the Facts - 40,000 politicians by name or zipcode
If I had to do it all over again,
I'd start with a stock tank like Bisbonian uses on his desert estate. It would be a lot simpler in construction. And being galvo steel to start with, it would last a lot longer. The cement board lid is sheer genius.
What I glossed over by using pictures was the amount of assembly needed - all of it fairly precise. Holes needed to be drilled accurately, and located accurately so the cans all lined up. The 3/4" barb fittings for the small tubes that run from barrel to barrel are threaded (male) on the end opposite the barb. That's both good and bad. The good is that they can be tightened a lot when a nut is run down on them. The bad was that the only fitting that could act as a nut was 2" long and a couple of bucks each. I sawed them in half for $ efficiency. More labor.
What makes my setup almost completely different from Bis' setup is that I rely primarily on greywater. My rainwater catchment is pitifully small and only acts as an afterthought. When there's rain, I don't need extra water. When there's no rain, like for a month last summer, there's no rain to fill the barrels. It's Catch-22.
Improve the Resilience Resource Library by adding your links.
Vote Smart - Just the Facts - 40,000 politicians by name or zipcode
Good morning AB and a big TY for this. Our greywater is like
yours - we make our own soap, dishwasher & laundry detergent, and cleaning products. The girls use store-bought shampoo, but that's probably it. I'm nervous with plumbing, but your post shows me it can be done. It's a great inspiration, mate, TY, for it. I do like my DIY How-To's to come with a sense of humour :=)
Bisbo can confirm, but the galvanized tank is a regular stock tank. You can get them at feed stores, rural co-ops, country stores, and Kijiji.
I've got a line on some used IBC totes, like this one:
(and now the software doesn't let me send the picture to the editor...I'll come back to it in a sec. They're 275g, which is nice. Just don't use one for water that carried non-food grade chemicals - yikes.
Back soon. Cheers mate,
Resilience: practical action to improve things we can control.
3D+: developing language for postmodern spirituality.
Let's try the image editor
Let's try the image editor again.
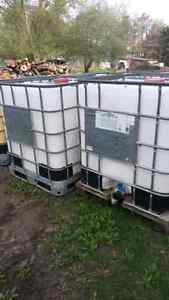
There it is! I'm going to the co-op in the next village over this afternoon to check on their stock tank prices while looking for some fencing material. The used IBC water tote will cost $100, so we'll see.
Resilience: practical action to improve things we can control.
3D+: developing language for postmodern spirituality.
The people I used to work for had one of these.
They'd fill it up and take it to jobsites that didn't have water so they could run their diamond hole saws. Those need a constant flow to keep the saw cool and lubricated. One of these would be much too big for me...
...but probably not for you. I just don't have the room, and not much need for that much capacity, (I've got a 30gal. garden), since I mostly rely on greywater.
And that's a point that needs to be considered. How much water does "x" garden need for a good watering? It's almost impossible to tell using tap water; the stuff never runs out. So in calculating storage capacity, one needs to factor "a watering" * 3 days (2 days if it's really hot) * typical dry spell.
So, I did a quick Amazon check (I use it as teh goog for "stuff") and this flow meter is only $15 There are several others, all in the same price range, so it's likely they're available in any "garden center."
I never got this precise because I just looked at the level gauge on the barrel. After a good soaking, the bobber was down 1/3, but you guys who are, or thinking of, getting started might give it some thought.
Improve the Resilience Resource Library by adding your links.
Vote Smart - Just the Facts - 40,000 politicians by name or zipcode
Oh thanks, AB! I'm gonna go look for the flow metre thingy.
I checked on the tote today: $125 for a clean food-safe 250g tank. My problem is just logistics and my famous five...bulging lumbar disks: getting the tote off the tarmac into our little Frontier truck's 51/2ft bed. Yikes. Sold the trailer -it was too big. Maybe I can use my shop crane :=)
I want to catch the rainwater on the heavy-rain side first, then add the greywater. Man, I appreciate the inspiration from your post. Now I just got to get 'er done!
Resilience: practical action to improve things we can control.
3D+: developing language for postmodern spirituality.
Find out how much the thing weighs empty.
IIRC, the dimensions are 4'x4'x4'. Next measure between your truck wheel wells. I'd be surprised if you didn't have 4'. Getting it on the truck is no problem. These totes have a built-in skid (pallet) as part of the design so they can be hauled around with a forklift. Your co-op have one? I'd be surprised if they didn't. How'd they get there in the first place?
No? Again, how much does it weigh empty? (I'll guess 100>125lbs.)
Formula: 30>35lbs.per-person/weight-of-tote = # of crew to put in truck.
Semi-gimp's Pro Tip: Ask for help. Corral a couple of customers if the co-op doesn't have enough manpower.
"Howdy neighbor. Think you could spare a few minutes to help an old fart get this monster on my truck?"
But first!
Have the site ready. If you're going to put the tote up on a frame, [strongly recommended for water pressure, and access to the valve at the bottom for watering cans or buckets], build the frame first.
1) Locate where the tote is going to collect rainwater.
2) This puppy is going to weigh 8.32*250=2080lbs. when completely full. That means you more than likely need a concrete pad, and/or piers at the minimum, for a platform measuring 4'x4'.
3) Your columns need to be 4x4s, and your framework at the top needs to be either 4x4s or 2x6s. (all pressure-treated)
4) X-brace 3 sides. (Leave the fourth side unbraced so you have access to store tools underneath.)
4a) Optional: Make the frame tall enough so you can store your longest shovel under the frame.
5) Optional: Sheath the outside with exterior plywood and voila... instant small shed.
6) Paint or shingle the outside of the "shed."
When all that's ready, assuming you're going the platform route, go and get the tote.
Do any of your neighbors have a backhoe? Most neighbors would most likely pick the tote and put it on the frame for $50 or a case of beer. Is a "Case of beer" a local barter denomination? If so, "What kind of beer do you like?" works wonders.
No platform route:
1) Once at home, drive the truck as close to the Permanent Resting Place(PRP) as possible. Open the tailgate.
2) With manpower: place some planks on the ground. Pick the tote off and skid it to the PRP. Done.
2a) Without manpower: See:1. Place planks on the ground. Tie the tote to a stake in the ground. Drive the truck out from under the tote, slowly. Plop!
3) Skid the tote to the PRP. Use levers or rollers (old broom handles.) If no rollers, liberally rub bar soap on the planks; makes for a smoother slide. (Extra points if you have a come-along. Secure it to the stake and hoist away.)
Once the tote is place, fit up the downspout. Don't forget the pantyhose filter inside the tote. Two layers doesn't hurt. Like, what else are you going to do with a one-legged pair of pantyhose? (Hint: convenience store stick-up to pay for the installation.)
Greywater is for a whole nother post.
Improve the Resilience Resource Library by adding your links.
Vote Smart - Just the Facts - 40,000 politicians by name or zipcode
AB, you're a godsend! Big, big TY, mate. I was going to pick it
up this afternoon and am just sitting here trying to figure out the how-to part. And here you are with all this practical advice.
Yes, I'm going to build a platform. After reading your advice, I realize the platform needs more attention than what I had figured. I'll just pay for it and finish the platform first. I have some recycled pressure-treated 4x4's and 2x2 concrete slabs. I really like the idea of making a storage space for garden tools!!!
I have a come-along and two ramps. And a 2-ton shop crane. I had to sell my beloved F-350 with the 8-ft bed - I just couldn't afford the upkeep. Luckily the totes are only 10 minutes away and I could make several trips.
First thing is to print out your advice and keep it in my pocket for reference!
Thanks very much, AB,
Resilience: practical action to improve things we can control.
3D+: developing language for postmodern spirituality.
Hey AB, I got the flow meter waiting at Home Depot. I had to
pay the Canadian Loonie surcharge #$%^&* exchange rates - CAD25 for a USD15 product! I'll pick it up when we go to the city. Thanks, mate,
Resilience: practical action to improve things we can control.
3D+: developing language for postmodern spirituality.
AB, "The Jack-Leg Agronomist"? Who dat?
Resilience: practical action to improve things we can control.
3D+: developing language for postmodern spirituality.
omg
thank you! I am in awe, green with jealousy, and already planning...
I can also recommend . . .
. . . using a series of 55-gallon plastic drums -- food-grade only -- which should cost about $10 apiece on Craigslist. I say a series because, like you, I want to hold more water at any time than would fit in one drum, but also because if you direct the overflow hose at the top of your first drum to empty into the second drum, and so on down the line, the water in the last drums will be completely free of any sediments from gutters, etc., that would be caught in the first drum or two.
Paint all the drums with plastic-adhering paint to make them opaque, protect the plastic a little longer, and prevent algae growth. I chose to use multiple coats of a pastel-colored paint to prevent heat buildup, but if you want to use the drums as a thermal sink in a cold frame or greenhouse, black would work. All hoses should be opaque as well (I use sections of an old hose from which I cut off any leaky sections). I raise the drums on concrete blocks and crappy scrap plywood (painted to help it last a little longer outdoors). Height is your friend, to facilitate the overflow hose's emptying into the next drum's top (though this is not necessary, just better), and to increase pressure when you irrigate from your last drum (this IS necessary, not least to permit you to fill a watering can from the spigot), so step the drums down by maybe eight inches (one concrete block height) from your topmost first drum to the next, and on down to your last drum that should ideally be at least two feet above any garden bed surface where soaker hoses empty.
ALL drums should have a spigot near (maybe three to four inches up from) the bottom to drain them in winter, when you don't need water except in greenhouses where you won't see freezing temps. Using the 55-gallon size means that in draining it in place you will only be having to tip the 50 pounds of water remaining below the spigot in the bottom to drain it more thoroughly (and a little water left in the drum won't hurt it in the winter). Having spigots on all drums also permits you to drain sediments out of your first drum at any time of year, or to replace any drum as need be at any time, or to draw on clean water for your parched garden from more than just the last drum.
A standard house or a small barn in a good 1-inch rain will yield 500 gallons or so in runoff. That's good water, better for plants than municipal water, to catch for drier spells for even a large garden. And where many of us live it would only overload the storm sewers otherwise. My rain-barrel set-up paid for itself in the first season, on top of protecting my plants through our regular summer dry patches. Every season since that one has been free water for the taking. If, like me, you envision something more substantial and/or remote in your future, you can contemplate cisterns, sized and potentially purified to take you off the grid altogether. But that introduces more variables and planning and savings.
I'd love to see you do a picture essay on your setup, dym.
The more of these we have, the more we can compare notes and adapt parts from here and parts from there.
The part about 50gal. drums that perplexed me was getting inside them to fasten fittings. How'd you overcome that? Did you use the drums that have the large screw-off cap?
Thanks for this comprehensive reply. Please, a photo essay. Oh! And where are you located?
Improve the Resilience Resource Library by adding your links.
Vote Smart - Just the Facts - 40,000 politicians by name or zipcode
Protecting plastic from UV
Shade cloth, from a nursery, nursery supply or hardware store will provide very good, though not perfect, UV protection for years. It is inexpensive and can be draped over the cans/barrels, or a simple frame to support it above them can be made out of the material of your choice.
That, in its essence, is fascism--ownership of government by an individual, by a group, or by any other controlling private power. -- Franklin D. Roosevelt --